


Coupons
Coupons
Save $4 off $20 purchase – not valid on sale or discounted items and not valid on previously purchased items
Save $20 Off $100 purchase – not valid on sale or discounted items and not valid on previously purchased items
Save $10 off $50 purchase – not valid on sale or discounted items and not valid on previously purchased items
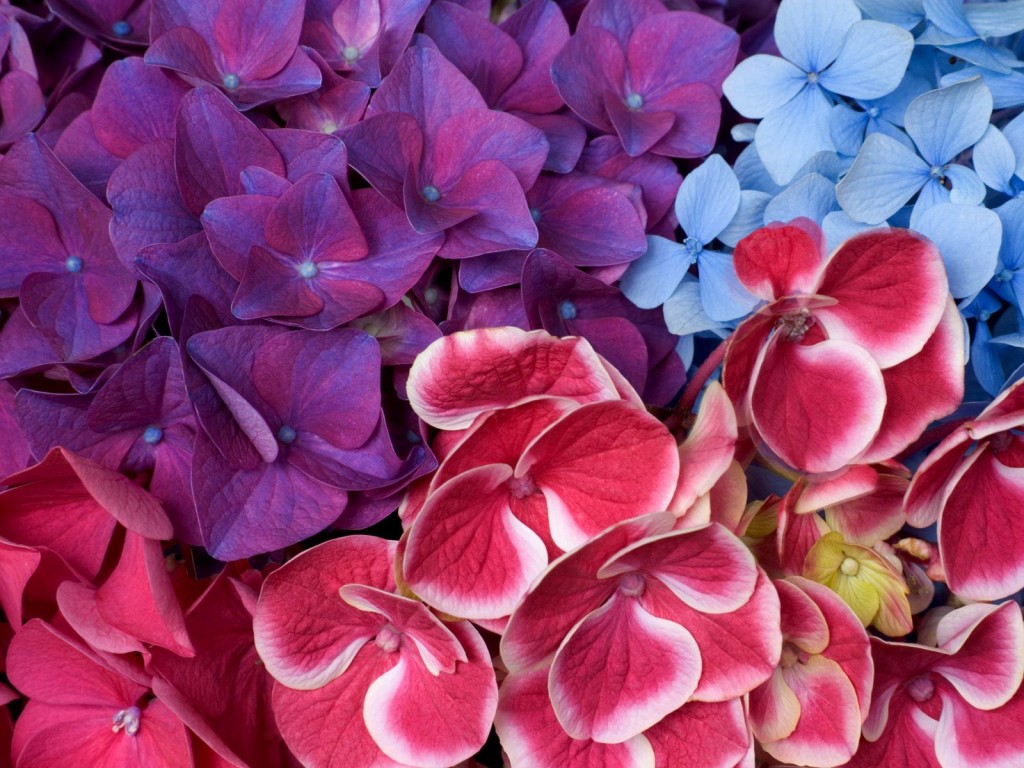
Hydrangea Color
 Hydrangeas are fascinating in that, unlike most other plants, the color of their flowers can change dramatically.
It would be nice if one could change the color of hydrangeas as easily as it changes in this little picture. But for most of us, it is not easy. The people who have the most control over the color of their hydrangeas are those who grow them in containers. It is much easier to control or alter the pH of the soil in a container than it is in the ground.
On the other hand, hydrangeas often change color on their own when they are planted or transplanted. They are adjusting to the new environment. It is not unusual to see several different colors on one shrub the next year after planting.
It is much easier to change a hydrangea from pink to blue than it is from blue to pink. Changing a hydrangea from pink to blue entails adding aluminum to the soil. Changing from blue to pink means subtracting aluminum from the soil or taking it out of reach of the hydrangea.
That said, I’ll give the best information that I have on this subject and let you take it from there.
 For hydrangea blooms to be pink, the plants must not take up aluminum from the soil. If the soil naturally contains aluminum, one must try to keep it away from the hydrangea’s system. Following are a few tricks that might work:
Add dolomitic lime several times a year. This will help to raise the pH. Shoot for a pH of about 6.0 to 6.2 (If it goes above 6.4 hydrangeas may experience an iron deficiency). Since hydrangeas take up aluminum best at lower pH levels, raising the pH will help to keep the bluing effect of aluminum out of the hydrangea’s system.
In areas that naturally produce blue hydrangeas (soils with aluminum), consider growing pink hydrangeas in large pots. If hydrangeas are grown in pots, it would be best to use soil-less mixtures, since these mixes would probably not have aluminum in them. In a pot, it will be much easier to control the requirements for growing pink hydrangeas
Use a fertilizer with high levels of phosphorus. Phosphorus helps to prevent aluminum from creeping into the system of the hydrangea. Choose a fertilizer close to the ratio of 25/10/10 (Phosphorus is the middle number).
 To obtain a blue hydrangea, aluminum must be present in the soil. To ensure that aluminum is present, aluminum sulfate may be added to the soil around the hydrangeas.
Authorities recommend that a solution of 1/2 oz (1 Tbsp) aluminum sulfate per gallon of water be applied to plants (which are at least 2-3 years old) throughout the growing season. Important: Water plants well in advance of application and put solution on cautiously, as too much can burn the roots.
To make the aluminum available to the plant, the pH of the soil should be low (5.2-5.5). Adding aluminum sulfate will tend to lower the pH of the soil. Another method for lowering the pH is to add organic matter to the soil such as coffee grounds, fruit and vegetable peels, grass clippings etc.
If the soil naturally contains aluminum and is acid (low pH) the color of the hydrangea will automatically tend toward shades of blue and/or purple.
The choice of fertilzer will also affect the color change. A fertilizer low in phosphorus and high in potassium is helpful in producing a good blue color(25/5/30 is good. Potassium is the last number). Superphosphates and bone meal should be avoided when trying to produce blue.
After stating this with much certainty, I hasten to add that it is virtually impossible to turn a hydrangea blue for any length of time if it is planted in soil with no aluminum and that is highly alkaline (chalky). One would have to be very diligent in keeping the soil properly conditioned as stated above.
Perhaps the best idea for growing blue hydrangeas in an area with alkaline soil would be to grow them in very large pots using lots of compost to bring the pH down. The above suggestions for bluing would also work for a potted plant. Reduce the strength of the Aluminum sulfate to 1/4 oz per gallon of water. In a pot, it will be much easier to control the requirements for bluing.
One last suggestions for those who are serious about this process. It is important to have your water tested so that it will not “contaminate” the soil that you have so rigorously balanced. The pH of the water should not be higher than 5.6.
Planting hydrangeas near a concrete foundation or sidewalk will often affect the color since the pH of the soil may be raised considerably by lime leaching out of these structures, making it difficult to obtain blue.
Why are my Hydrangeas not Blooming?
There are three possibilities for lack of flowering among the hydrangea species. The first two – too much shade and improper pruning – apply to all hydrangeas, while the other – weather-related damage to flower buds – applies primarily to the Bigleaf hydrangea.
Too Much Shade
While most Hydrangea species benefit from some shade, too much shade can reduce flowering. This is particularly true of Panicle hydrangea, which is the one Hydrangea species that grows well in full sun. If you have a hydrangea that used to bloom well but now flowers only sparsely, evaluate whether the growth of nearby trees has reduced the amount of light that reaches the hydrangea. If so, you may want to consider moving the hydrangea to a sunnier location.
Improper Pruning
Improper pruning can also reduce flowering in Hydrangea. Since Bigleaf and Oakleaf hydrangeas flower on previous year’s growth, potential flowers buds would be removed if the plants were pruned in fall, winter or spring. Panicle and smooth hydrangea flower on this year’s growth, so pruning them in early summer would reduce or eliminate flowering for that year.
 Frozen Buds
The most common reason for lack of flowering in the Bigleaf hydrangea is unfavorable weather. Most Hydrangea Macrophylla cultivars flower primarily on previous year’s growth. Weather conditions that damage aboveground parts of the plant can reduce flowering. Damaging weather conditions include early fall freezes that occur before the plant is completely dormant, extremely low winter temperatures, and late spring freezes that occur after the plant has broken dormancy. In USDA Cold Hardiness zone 6 and warmer, which is the recommended growing area for H. Macrophylla, the most common of these unfavorable weather events is late spring freezes that damage tender new growth. This is particularly true in the southeastern U.S., where “see-saw” temperatures are very common in the spring.
‘All Summer Beauty’ Bigleaf hydrangea responds quickly to warm temperatures in late winter and early spring by breaking dormancy and producing new leaves. Unfortunately, these spells of warm weather are often followed by periods in which temperatures reach well below freezing. The severity of the damage caused by these freezes depends on how many of the buds had broken dormancy. If a substantial portion of the buds on a stem were actively growing, the whole branch may die. For some cultivars, the loss of the aboveground part of the plant will completely eliminate flowering the following summer. The plant will produce new buds from the base of the stems, but stems produced from these buds will not flower in these cultivars.
Other cultivars, such as ‘All Summer Beauty’, ‘Nikko Blue’, and ‘Madame Emile Mouillere’ are a bit more flexible, and will flower from the buds that develop from the base of the stem. However, if another cycle of warm weather followed by freezing temperatures damages shoots developing from these buds, these cultivars may flower only lightly, if at all.
 What should I do?
It may be possible to protect plants from weather-related flower bud damage by covering them during late spring freezes with blankets, sheets, etc. There is also evidence that some bigleaf hydrangea cultivars have the ability to flower on current year’s growth, which means that, even if the plant is killed back to the ground, it should still flower during the subsequent summer. One such cultivar is ‘Endless Summer’ (Bailmer©), which was released to the retail market in 2003.
Re-flowering ability has also been reported in the cultivars ‘Decatur Blue’, ‘Oak Hill’, ‘David Ramsey’ and ‘Penny Mac’. These five cultivars, which are similar in appearance, produce blue flowers in acidic soil and pink flowers in neutral soil.
While the primary reason for growing Bigleaf hydrangea is for the flowers, a few cultivars have ornamental foliage that makes the plant attractive even when not in flower. Cultivars with variegated or gold foliage, such as ‘Mariesii Variegata’ or ‘Lemon Zest’, can brighten up a dark spot in the garden.
(The United Sates National Arboretum)
Establishing Lawn and Turf
 Every homeowner dreams of a beautiful long-lasting lawn. Care for your turf and lawn really is not that difficult once you establish what type is suitable for your location and climate. With some initial investment in time and effort, you can have a healthy, beautiful lawn. Healthy well-maintained lawns will actually crowd out weeds and minimize the need for chemical controls.
To begin, select the proper grass seed or sod blend appropriate for the area to be planted. Take a soil test to determine the fertilizer and lime needs of your lawn. After the test, the soil should be spaded or tilled to a depth of 4-6 inches, incorporating recommended rates for fertilizer and lime. Rake the area to remove any debris and stones larger than a quarter. Area should also be graded for proper movement of water.
Once the soil preparation is completed, you can begin seeding the lawn. Grass seed should be applied with a spreader recommended for the specific seed blend. If possible, the seed should be spread in two directions, at ninety degrees to one another. The seed should be lightly covered by raking or rolling into the soil. Be certain not to cover the seed more than 1/4 inch.
Mulch the seeded area with straw or burlap to help retain moisture. Water immediately and repeat as necessary to avoid allowing the surface to dry. Water should be done in the early morning or evening. Try to avoid watering in the middle of the day. This can cause the area to burn up. Do not water overnight – too much moisture will cause seed decay and inhibit disease. Try to maintain a wet layer of at least 1″ deep uniformly across the area.
 Mowing should be done when grass reaches 3-4 inches in height. The mower should be set at 2-3 inches. Never mow off more than 1/3 of the grass blade. Watering should continue through the second or third mowing, and during dry spells for the first year. For proper fertilizer and weed control, consult a horticultural professional for assistance.
If you need to sod your yard, prepare soil as stated above. Install the sod so that all seems are butted closely together and no portion is overlapped or tuned under. Finished sod areas must be rolled. Water should be applied to the point of total saturation over all areas. As needed, water until the first mowing to prevent drying out. After the first mowing, repeat until sufficient root growth has been re-established. Watch for discoloration and drying, and water as needed.
The Pennsylvania Landscape and Nursery Association (PLNA) recommends you ask a member for advice and guidance whenever you are working on your landscape. The PLNA is an organization working to improve the professional standards for the landscape and nursery industry.
Watering guidelines
Congratulations on your new plant installation! Here is a list of some frequently asked questions that we get regarding watering your new plants. If you have further questions, feel free to give us a call or stop in.
Why is watering so important?
Water is one of the key common substances required by all living things in order to sustain life. Just like our own bodies, plants require water to survive. If we don’t drink enough water, we feel dehydrated and can’t function. And if we drink too much water, we feel sick. Plants react the same way.
How do I know when my plants need water?
Pull the mulch away from underneath the plant around the drip line and feel about 1-3” below the soil. The drip line is the outer edge of the branches. If the soil seems damp or moist, you have sufficient water. If the soil feels dry or is hard to penetrate with your finger, it needs water.
What is the best method to water my plants?
The best method of watering is to use an open-ended hose, not a sprinkler. Since plants prefer a slow soaking, turn on the water to a slow trickle, and water at the base of the plant. Do not water the leaves.
As a general rule, watering should be deep and infrequent, as this helps plants to establish a strong root system. Watering so that only the surface of the soil is damp will make the plant’s root grow towards the surface rather than deep down, which leaves the plant vulnerable during hot periods or times when you do not water.
How much water do I give my plants?
A thorough soaking will take from 20 seconds for small plants to 2-3 minutes for larger shrubs and trees. Please see the chart below:
Small plants (1 gallon containers) – 20 seconds (about ½ gallon of water)
Medium plants (3-7 gallon containers) – 40 seconds (about 1 gallon of water)
Large plants (15 gallon containers & B&B) – 2 minutes (about 3 gallons of water)
Why shouldn’t I use a sprinkler to water?
We find that watering by hand is not only better for the plants, but also uses far less water.
What time of the day should I water?
There is a lot of dispute in the landscape industry as to when the best time of the day to water. Some will say the best time of day to water is early morning, before the heat of the day has set in. This reduces the amount of water lost through evaporation, and also provides water for the plants to help them get through the heat of the day.
However, others will tell you to water in the evening when the summers are hot. The coolness of the evening will allow the plants ample time to absorb the water, instead of competing with the hot sun that can dry the water up before the plants get to absorb it.
Most agree not to water the garden during the heat of the day. The water will evaporate, rather than penetrating the soil. Remember, the goal is to deeply soak the soil, encouraging the plant to put out more roots to search for water.
If watering in the evening after the heat is passed, make sure to water early enough that the leaves of the plants will completely dry before night time. Fungal infections can colonize leaves which are left moist overnight, and roots will also suffer from being watered in the late evening. Being left moist and cold at night can lead to rot and fungal infections of plant roots, an undesired result.
If you are using irrigation system, set the system to water your landscape in the morning not past 8:00am.
How often should I water?
This is probably the most frequently asked question, and it is the million dollar question! The answer – when it needs it of course!!
As a general rule of thumb, we recommend watering your new plants twice a week. Depending on weather conditions and what season we are in, this rule may change. Perennials and annuals may require more than this especially in the summer since they have a much smaller root ball. When in doubt, check the soil as mentioned above.
If it rains, does that count toward my weekly watering?
Rainfall less than 1” should not be considered watering. Unless we have a long soaking rain, it will RARELY supply sufficient water to your plants. Again, when in doubt, check the soil as mentioned above.
Should I water in the winter?
The short answer to this question is no. Usually during the winter, the ground is frozen so the roots will not be able to uptake any water. However, if the ground is not frozen and we are getting sunny warm days, you may want to take a short run out to your plants to check the soil moisture levels.
How long do I have to keep up this watering schedule?
It is very important that plants receive the proper amount of moisture for at least the first two years after installation and during drought conditions thereafter. During a hot, dry spell in mid-summer, established plants would benefit from occasional deep watering. Water once or twice weekly, depending on the severity of the weather.
Should I water all my plants the same way?
Not all plants have the same water requirements. Plants are placed in your landscape based on the existing sun and water conditions and should be able to tolerate those conditions. In other words, if you have a hot dry location, you should be planting drought-resistant plants, like Juniper, Grasses, Sedum, etc. These plants require much less water than plants that grow well in moist areas, such as Astilbe and Iris.
How can I tell if I’m over watering?
The leaves on the plant will become dark and wilted, usually starting at the tip, or they will turn yellow. This is the point when most people will make the fatal mistake of thinking their plants need more water.
Plants, just like humans, need water AND oxygen to survive. The soil in which roots grow is filled with pores where water and oxygen flow. If there is too much water in the soil and no room for oxygen, you will basically suffocate your plants by depriving them of air.
Once the plant has gotten to this point, sometimes it is too late to rejuvenate. If you have been watering your plants regularly, STOP watering your plants and give them time to dry out. Remember, if conditions are normal, you should not be watering your plants more than once or twice a week.
How can I tell if I’m not watering enough?
The first thing to ask is “When is the last time I watered my plants?” If you can’t remember, chances are they are being neglected. If your plants are wilting or becoming dry and crunchy, check the soil for moisture levels. If the soil is bone dry, refer to the instructions on how much water to give your plants. Do not start to overwater your plants, but get them back onto a watering schedule of about two times a week under normal conditions.
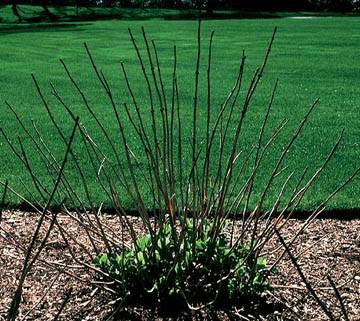
Winter burn on evergreens
The ground is thawing… the snow is melting… the sun is shining… and now you can see…
… My Japanese Hollies have brown patches!
… My Southern Magnolias look bad!
… My Leyland Cypresses look burnt!
… Cherry Laurel, Yews, Junipers, Boxwoods, Rhododendrons…………..
 This type of damage occurs when a plant’s tissues dry out from wind or ice-melting chemicals, lack of moisture in the air or soil, or a “wrong plant/wrong location” scenario. Evergreens are particularly susceptible because their leaves never stop losing water, even during their “dormant” season. When these leaves evaporate more water than the roots take in, you’ll see some damaged foliage.
During severely cold weather, the ground surrounding the root system can freeze, which decreases or stops the uptake of water. If the weather turns warm and sunny while the ground is still frozen, evaporation increases and discolored or “burned” foliage starts to appear. The damaged leaves are generally concentrated on the side of the plant facing the wind, where evaporation is greatest.
 How do i fix it? Most leaves will fall or be pushed off by new growth, but those that don’t can be hand-stripped or pruned away. Premature pruning can increase damage by exposing vulnerable inner leaves, so resist coming to the rescue of your plants too early.
How do I prevent it? If conditions are dry in fall, make sure you water to compensate for the lack of rain. If plants begin to show signs of winter burn, pull out the hose on the warmest day possible (to avoid the hose freezing and bursting) and water the frozen ground to melt the moisture frozen in the soil and make it available for uptake. It’s also a good idea to maintain a 2- to 3-inch-thick layer of mulch to reduce water loss.
Although unattractive, windbreaks of burlap, canvas, or similar materials can be installed to protect small evergreens. Do this in fall to help reduce the wind’s force and to help shade your plants.
Frequently Asked Questions
Photo Archives


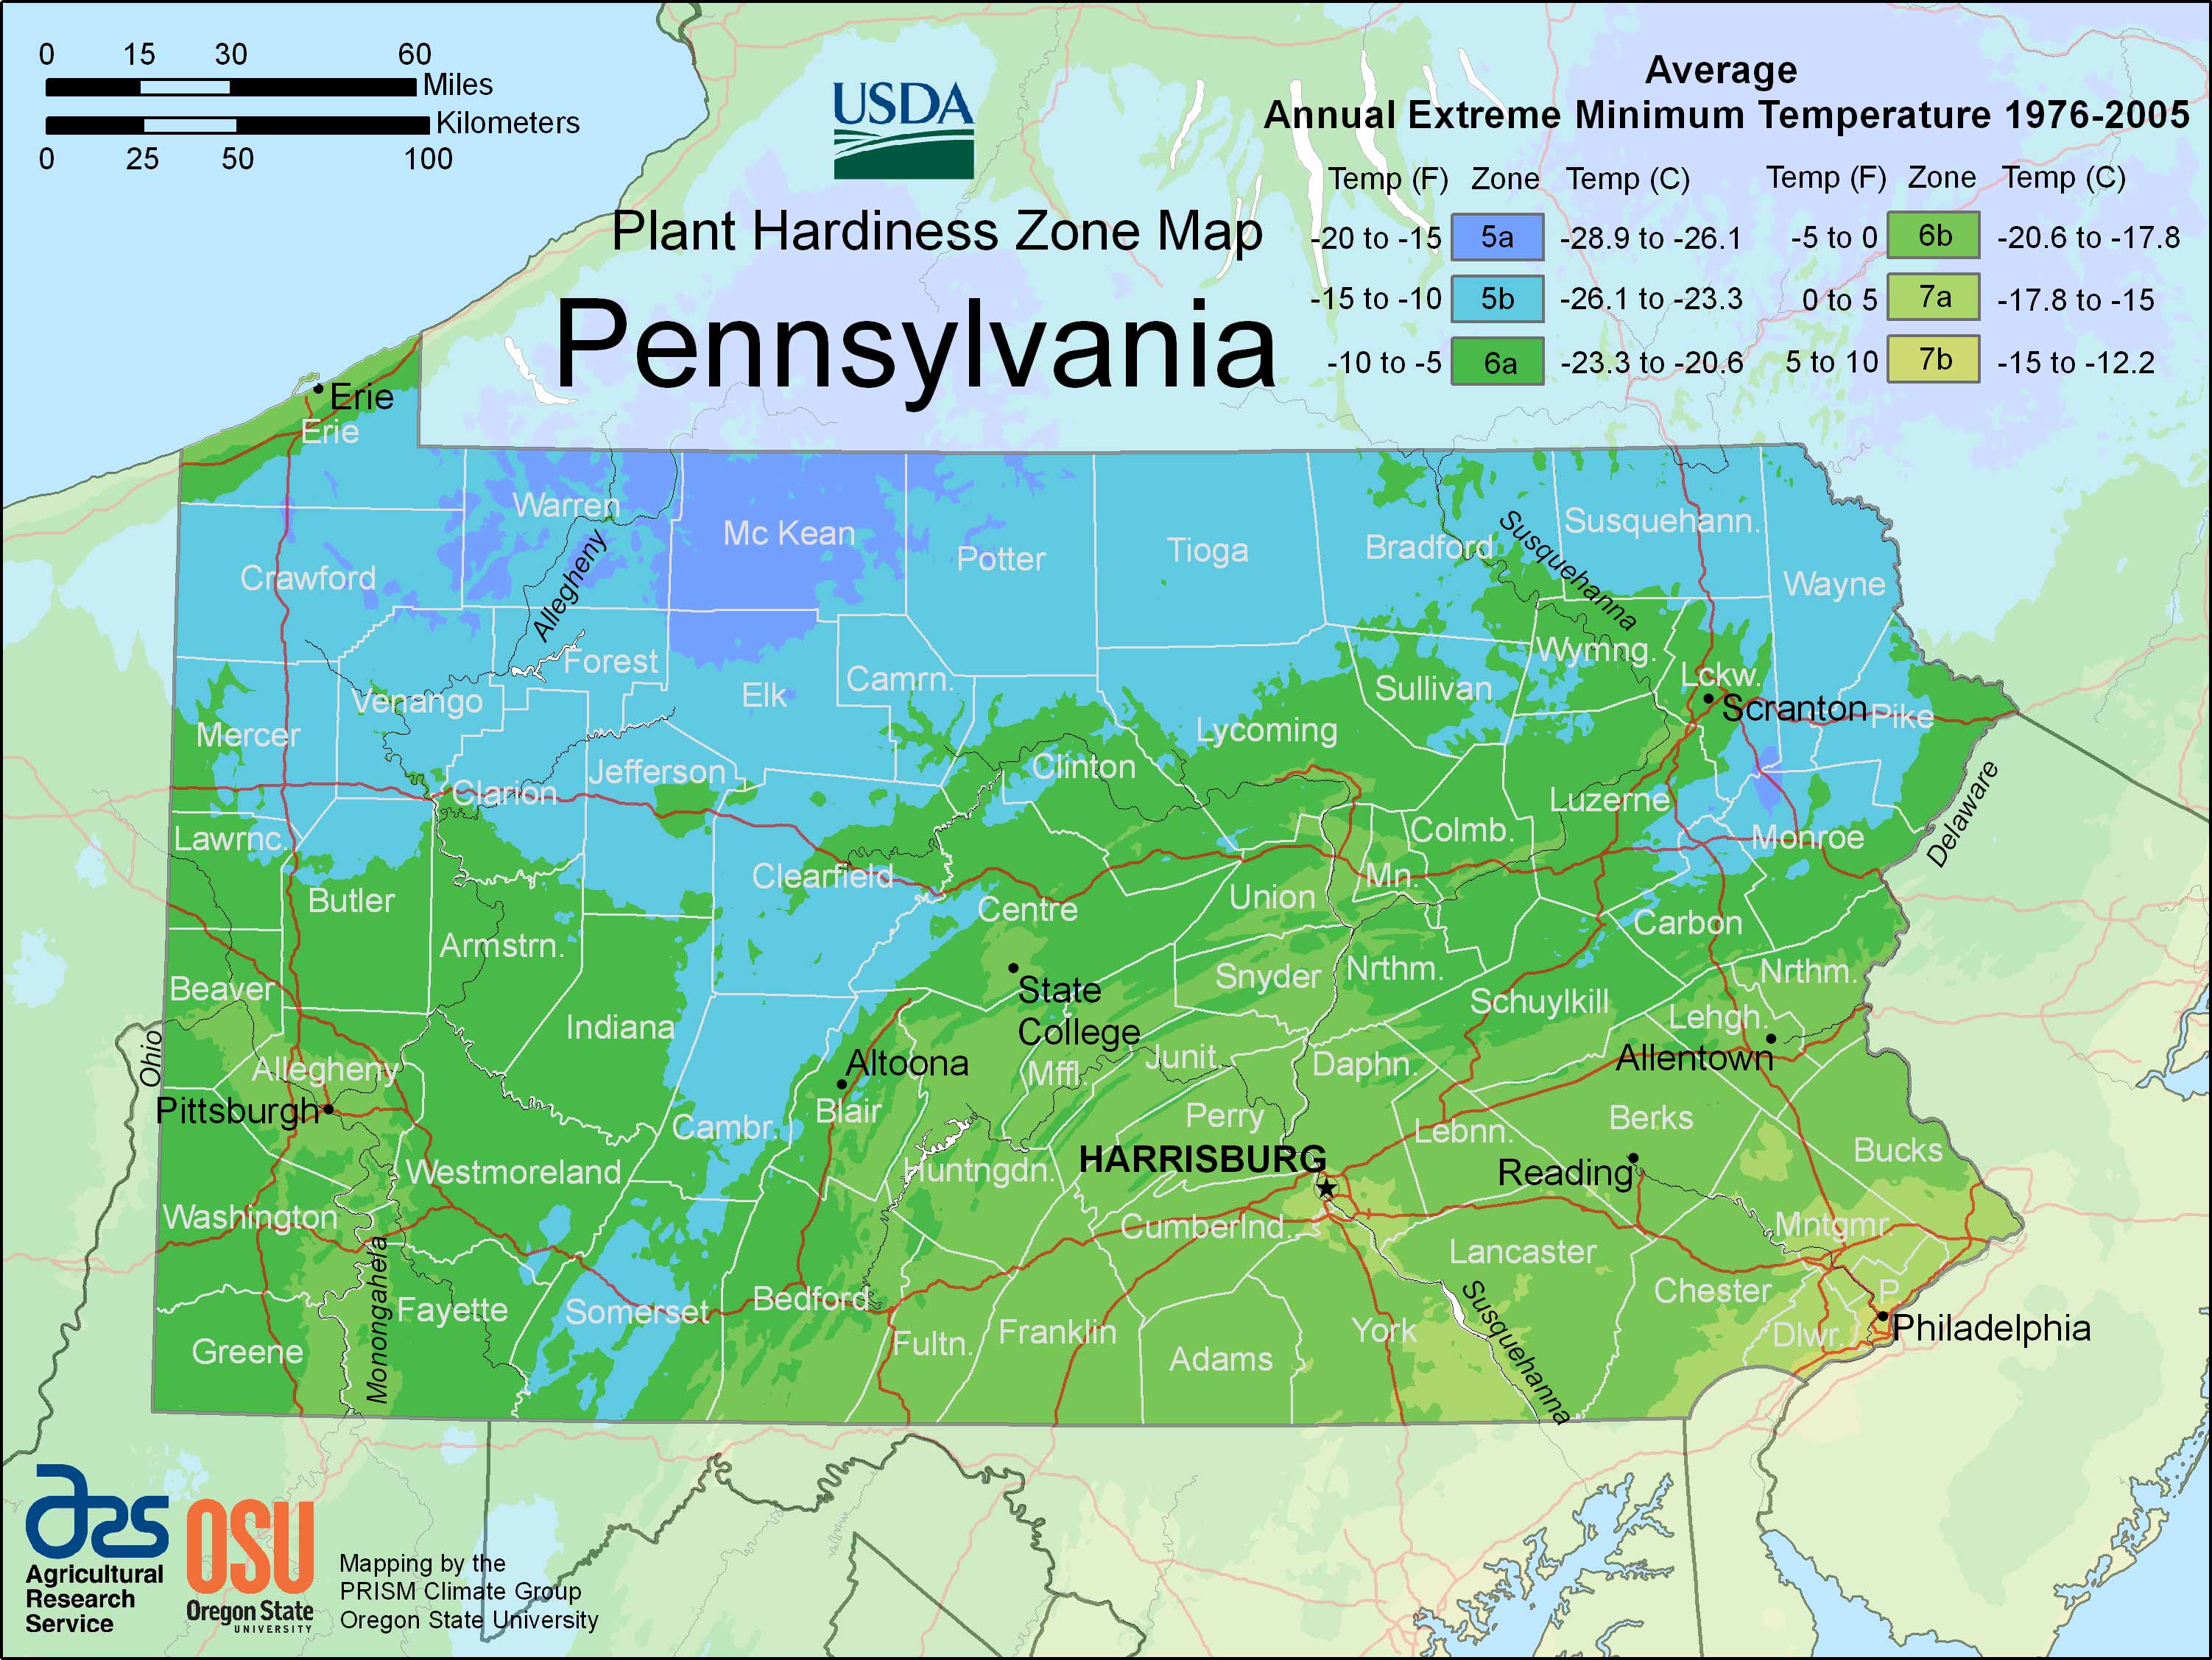
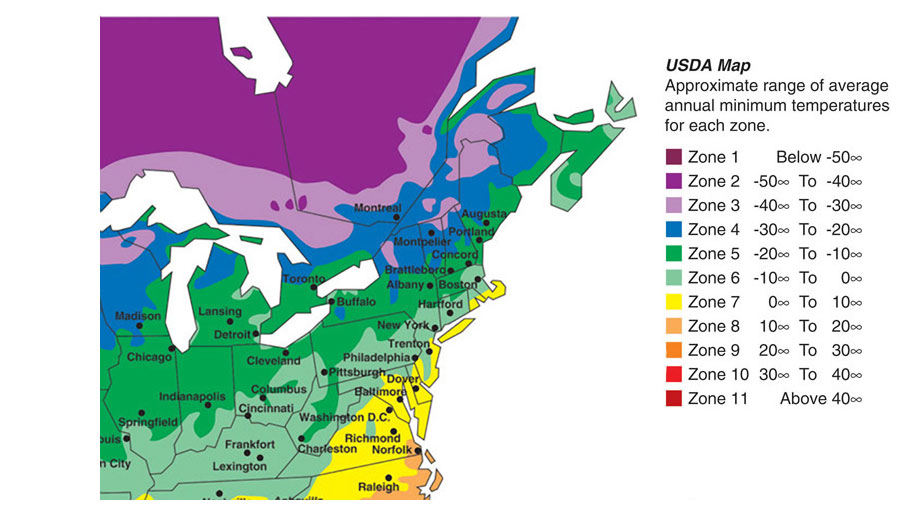
What zone are we?
York County is included in both Zone 6b and Zone 7a.
To be safe when purchasing plants, use Zone 6 plant choices.
Product Coverage
How much mulch do I need?
- First you need to figure out your square footage. Multiply average length x average width. (Ex. 8’x30′ = 240 Sq. Ft.)
- Take the square footage and divide by 5. (One bushel covers 5 square feet at a 2? depth.) This number is the amount of bushels needed. (Ex. 240 / 5 = 48 bushels)
- Divide this number by 15. (Our scoop equals 15 bushels.) (Ex. 48 / 15 – 3.2 scoops)
- 3.2 is the number of scoops required. In most cases, you should round up to the next scoop. In this case you should order 4 scoops. That way you will have enough if you mulch more than 2? in some places.
Our scoop equals 2/3 cubic yard.
1 cubic yard = 22 bushels
1 cubic yard covers a 10′ x 10′ area at 2″ depth
Topsoil
1/2 yard covers 80 Sq. Ft. at a depth of 2″
1 scoop = approximately 1/2 cubic yard
What size pond liner do I need?
Width – Take width plus 2 x’s the depth and add at least one foot for overhang.
Length – Take length plus 2x’s the depth and add at least one foot for overhang.
We do not recommend seams!
Stone
Cubic Yards x 1.66 = Tons of stone needed
To figure cubic yards – multiply length x width x depth in feet. This gives you cubic feet. Then divide by 27 to get cubic yards.
Copyright © 2010, The Landscape Company & Nursery, All Rights Reserved
1123 Felton Road - Red Lion, PA 17356 - Phone: 717.246.1063 - Email: info@tlcandnursery.com